![Convert an Existing HTTP WordPress Site to HTTPS-Only [5 Easy Steps]](https://jdacsolutions.com/wp-content/uploads/2018/01/Convert-an-Existing-HTTP-WordPress-Site-to-HTTPS-Only.jpg)
Everyday, the threat of online hackers continues to grow and it’s essential to secure websites using SSL and HTTPS. This article describes how to convert your existing HTTP WordPress site to serve content only on the Hypertext Transport Protocol Secure (HTTPS) channel using secure socket layers (SSL).
Note: this article assumes that you have already obtained an SSL certificate for your website and have installed it on your web server.
How to Convert an existing HTTP WordPress Site to HTTPS-Only in 5 Simple Steps
- Force all traffic coming to the admin and login areas of the site to SSL-Only.
- Secure all public areas of your WordPress website
- Secure all asset requests with a simple modification to the .htaccess file.
- Clear any cached resources from WordPress.
- Identify any remaining issues you may need to address from previously operating over HTTP.
Secure the Admin Areas FIRST
The first area that needs to be addressed is the user login and admin areas of your WordPress site. If you’re new to WordPress, the admin area is the place where all the magic (and your hard work) happens. It’s imperative to secure this area immediately.
Connecting via HTTP
To access the admin area of your website, enter your URL in the address bar using HTTP, as in http://yoursite.com/wp-admin. Or, you can simply enter yoursite.com/wp-admin in the address bar and the result will be the same. Over an unsecured connection, you will see something similar to the following, depending on the browser you are using.
![]()
The first thing you’ll notice is the site information icon ![]() , also known as the ‘dreaded eye’, to the left of the URL. In today’s environment, you never want to see this on your site.
, also known as the ‘dreaded eye’, to the left of the URL. In today’s environment, you never want to see this on your site.
Content passed between computers over an unsecured connection is transmitted as what is known as plain text. This means that, with the right software, bad actors can intercept this data being passed between the computers and read it without difficulty.
Content passed over a secured connection can still be intercepted, however, the content will be encrypted and will be very difficult if not impossible to decrypt without the proper keys.
Connecting via HTTPS
Now, in the same browser, re-enter your URL into the address bar, but this time use a secure connection by typing ‘https://’ in front of theURL, as in https://yoursite.com/wp-admin. The picture below shows that you are connecting to the site over HTTPS, but the browser still indicates the site is not totally secure.
![]()
The lock icon with the red slash in front of the address in the browser indicates a secure connection and that the information flowing between the computers encrypted. This is a good start but the dreaded eye indicates there are still problems with the site security.
In its current state, the site can be accessed across both unsecured (HTTP) and secured (HTTPS) connections. In terms of security, this is like installing a formidable lock on the door to your business, but never actually engaging it. The site needs to be locked down.
Locking it Down
Forcing WordPress to use only secure connections for user and admin logins is straightforward and simple. Simply add the following entry to your WordPress main configuration file.

The wp-config.php file is normally located in the root directory of your site where all WordPress files are stored on the web server, typically ‘public_html’ or something similar. Optionally, as a security measure, this file may be located in the directory immediately above the directory where the main WordPress files are stored. WordPresss knows to search in the parent directory for this file if it is not found in the main site directory.
Locate and open this file in your favorite text editor and add the two lines shown above. The comment above the ‘define’ command is purely optional. However, adding comments to changes made for any reason is a good practice and makes maintaining the site easier down the road.
Once you’ve added this line to your config file, save the changes. If your website runs on a remote server and you either already had a copy of this file locally, or downloaded it via FTP to work on it, you will need to upload it back to the server for the change to take effect on your website.
Now try access the admin area of your site over HTTP. You’ll see that the browser forcefully redirects you to the secure address at https://yoursite.com.
Secure all Public Areas of your Website Using the WordPress Admin Dashboard
Although all WordPress site login screens and admin areas are now secured, the public area of the site is still running over HTTP.
Notice the dreaded eye to the left of the URL in the address bar. Unfortunately, the changes made in the previous section don’t address the public areas of the website. To properly convert an existing HTTP WordPress site to HTTPS-only, both sides of the site, public and private, have to be secured.
Securing the public sections of your website may or may not be a big deal to you. I’ll say this though – if your site uses any forms whatsoever to capture user information, even if it’s only a simple contact form, you should be concerned.
Website security is a huge deal to Google. In fact, failing to properly secure your site using HTTPS and SSL certificates will negatively impact site reputation and your site’s page rank (PR).
A Quick Note on Contact Forms
Even if it’s only a simple contact form with no credit card or other sensitive information, it’s a bad idea to provide any information over an unsecured connection. At the minimum, your visitors’ names and your email addresses, and possibly telephone numbers and physical addresses are being requested. Never send or request your visitors to send any information over HTTP!
Verify Your WordPress URLS Specify HTTPS Connections
Log in to your WordPress Dashboard. Open the general settings by clicking on the ‘Settings’ option and selecting ‘General’ in the left navigation menu. This will open the main settings panel that controls site-wide settings for your WordPress site. In the middle of this screen you’ll see two fields for your website’s address like this:

Your URL structure may be a bit different depending on whether your CMS runs at the root level of your site, as a subdomain, or in as a sub-site. The important part, though, is the ‘http’ part. Change the beginning of both addresses to ‘https’ as in:

Now, scroll down to the bottom of the page and click the ‘Save Changes’ button.
In your browser, go back to the tab showing your home page and refresh the page. The web server is now forcing all traffic over to the secure connection. Note the padlock in front of the URL.
At this point it may be that the dreaded eye is still displaying in front of the padlock. If this is the case, it’s most likely due to mixed content being served across the secure connection.
Mixed Content Issues
Everything addressed so far has to do with page-level access on the website. What has to be realized is that when page is requested in browser, the page itself makes many additional internal and external requests in order to gather the required resources so it can be properly rendered by the browser. What’s happening here is that the page itself is not making these requests over a secure connection.
These resource requests are generally for other pages (as in the case of iFrames), style sheets, images, and scripts. These requested resources are commonly referred to as assets. The next section of this article discusses how to ensure asset requests are being sent securely.
Securing CSS and JavaScript Requests
Locking down the site admin and login pages and changing the site URLs to start with “HTTPS” instead of “HTTP” is a good start, but it’s only a start. To convert an existing HTTP WordPress site to HTTPS-only, the manner in which site pages requests assets must also be addressed.
Modifying the site’s .htaccess file is a simple way to control web page asset requests. This file is located in the root directory of your site’s WordPress folder. If you open the file in a text editor, you will see something similar to the picture shown below.
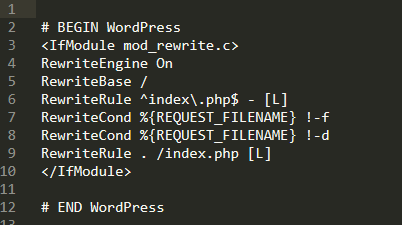
This is the standard .htaccess file that is created with any new WordPress installation. First, the file checks whether the mod_rewrite.c module is enabled on the web server. If it is, .htaccess filters all requests coming to the server through this set of rules before the server processes and responds to them. Basically, this tells WordPress to send any permalink request to index.php for processing, and if the request is already for index.php, ignore any further processing. What is needed is a way to determine whether requests are coming in over HTTP or HTTPS and to force any HTTP requests to come back over HTTPS.
Secured and Unsecured Traffic
Practically everybody has heard the term, “Information Highway.” Taking that a bit further, think about all the request traffic coming into your website on this information highway and picture toll booths in front of the web server much like toll booths on a tollway.
This is an oversimplification, but it’s a good analogy for any nontechnical readers out there. In a real tollway, you’d see different lanes for different traffic. Vehicles with more than 2 axles take the center lane, vehicles with only 2 take the right, and Toll-Pass customers breeze on through the left lane – you get the picture.
Web traffic comes into the web server on different lanes also. These ‘lanes’ are called ports. Specifically, unsecured web traffic over HTTP generally comes in on port 80 and secured web traffic over HTTPS usually comes in on port 443. These are default settings that providers may, depending on the situation, change to meet security requirements.
Rewrite conditions and rules can be used to identify traffic NOT coming in on port 443 and redirect that traffic back to the secure lane. This is done by rewriting these requests using directives in the .htaccess file as they come into the web server.
Redirecting Traffic to Port 443
Since all requests, no matter where they originate, should be coming over the secure connection, this is the first thing that will be handled in the .htaccess file.
A Note on # BEGIN WordPress and # END WordPress
In the picture shown above you should have noticed the top and bottom lines, # BEGIN WordPress and # END WordPress. You should not place any custom directives between these two lines in your .htaccess file. This is because this section can be overwritten by WordPress. In fact, the comments included by WordPress specifically state that unless you are using WordPress filters to modify the lines between these two markers, no changes should be made.
Creating Custom Directives
In order to add custom directives to the .htaccess file that won’t be overwritten by WordPress in any event, create a custom directives section block at the top of the file:
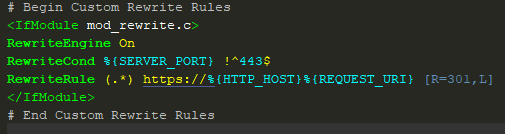
Although all text should be added to the top of the .htaccess file as shown, the lines to be concerned with are those two lines beginning with “RewriteCond” and “RewriteRule”
The first line, “RewriteCond %{SERVER_PORT} !^443$” tests to see if the incoming request to the web server did not come in on port 443. If that is true, then the rewrite rule immediately following the test redirects the request to the secure HTTPS port. The ‘L’ flag at the end of the rewrite rule tells the processor to stop executing any further rewrite rules found in the file.
When the request comes back in on port 443, the .htaccess file sees that the request doesn’t meet the initial condition, so it continues with normal processing of server requests.
Once you have added this section to the top of your .htaccess file, save the changes and then upload the changed file back to your web server using FTP. Now it’s time to test your changes in the next step.
Confirming the Changes
Go back to your home page in your browser and once again refresh the page. If all is well, the browser no longer displays the dreaded eye in front of your URL. Instead, it happily replaces it with the safe, green padlock that gives the world warm assurances that it can safely interact with your website.
If you still see the ‘dreaded eye’ and you are using a caching plug-in to improve site performance, it’s very common at this point that your site is still serving assets that have been cached in unsecured connections. The next section discusses how to clear the cache.
Clearing Cached WordPress Resources
Now that you’ve secured the public and private areas of the site and also secured asset requests, you’re firmly standing on solid ground in your effort to convert an existing HTTP WordPress site to HTTPS-only. However, you can sometimes complete all of the steps in the previous sections and still see the dreaded eye:

Many WordPress websites use plugins to speed up and improve the performance of the website. Rather than retrieving common site elements from the hard drive, performance gains can be realized by caching these elements. Unfortunately, at this point some of these elements in the cache reside on unsecured connections. Correcting this problem is a simple task of clearing the cache. The section below provides an an example of clearing the cache for one of the most popular caching plug-ins, W3-Total-Cache, although the concept should be the same as for any caching plug-in.
Clearing Plugin Caches
Two popular plugins used for improving WordPress website performance are W3 Total Cache and WP Super Cache. In order to clear the cache, you need to be logged in to the WordPress Admin Dashboard. Clearing, also called purging, the cache clears all cached assets and resources. This will result in the cache being repopulated with elements that are served only over secure connections in the future.
For W3 Total Cache, mouse over the ‘Performance’ link at the bottom of the admin navigation menu and select ‘Dashboard’. Open this dashboard and click on the ‘Empty All Caches’ button. This will be located at the top of the dashboard on the left side.

If you are using a different caching plugin to optimize your website, check with the developer’s page if you need assistance clearing the cache.
For the most part, the first four steps above should complete the steps needed to convert your existing HTTP WordPress site to HTTPS-only. However, certain cases require a little more work. The last section of this article addresses these situations.
Identifying Remaining Issues
In some cases, if you have performed numerous appearance customizations on your WordPress theme and especially if you have uploaded a large volume of media to your Media Library before converting your website to operation only across HTTPS connections, completing all of the steps above will not remove the dreaded eye. In these cases, you have to dig a little bit deeper to resolve the issue.
So, the first thing you can do to determine why you are still seeing the dreaded eye is ask the browser itself. I use Google Chrome and Firefox for virtually all of my browsing. As this is what I am most familiar with, I’ll be “speaking Chrome” as I go through the following steps.
With the dreaded eye on the address bar staring right at you, open the Chrome Developer Tools (Dev Tools) in the browser to look for a quick fix. Do this by pressing CTRL+SHIFT+I (or F12) on the keyboard. This opens the Dev Tools panel in the browser. Fortunately, Dev Tools provides a wealth of information and and invaluable assistance in troubleshooting these issues.
Using Developer Tools to Identify Issues
Once you’ve opened the DEV Tools window, click on the Security tab at the top of the window. The security tab provides initial information regarding the security situation on the website, such as certificate validity, connection status, and resource requests. A typical culprit in these cases is mixed content, meaning some resources are being requested over HTTPS and others are being requested via HTTP.
Reload the page and use the Network and Code Inspect panels to determine which resources are being requested via HTTP and then modify any code or settings to ensure all resources are being requested internally via HTTPS only. These types of issues are generally easy to run down and resolve.
One Final Note
Depending on how long your site has been running on an unsecured HTTP connection and how many customizations have been made to it, you may be facing a situation where multiple guids in the WordPress database tables are stored using ‘http://’ instead of ‘https://’.
If the Dev Tools Network panel shows multiple items being requested via HTTP, each one of these have to be chased down individually. Their causes determined, and fixes implemented. This can turn into a daunting task.
Some SEO books actually suggest that it is easier to scrub a site and start from scratch using HTTPS. However, that notion may be a bit radical.
If you have any trouble, feel free to give me a shout! Either leave a comment below or drop me a line using my Contact Form. I will be happy to help.
If You’ve Gotten This Far
If you’ve reached this point of the article, I’d like to first thank you for taking the time to read all the way through it. I realize it’s quite lengthy, but there’s so much that can be covered here.
By now, you’ve seen that the job to convert an existing HTTP WordPress site to HTTPS-only touches on some different but related areas. In conclusion, we can boil all of this down to 5 steps:
The 5 Steps to Convert an Existing HTTP WordPress Site to HTTPS-Only
- Making sure the log in and admin pages of your site use the HTTPS protocol.
- Making sure all public areas of your site use the HTTPS protocol.
- Securing website asset requests with the .htaccess file.
- Clearing site performance improvement caches.
- Finally, resolving possible theme customization issues.
Thanks again for reading, and Have a Great Coding Day!